Pic-See ($29.99 at time of review, iPad only)

I love the included library of images- very clean and simple. At first I thought the image library hadn't downloaded properly, as when I tapped on the Pic-See Library icon, there weren't any images. As it turns out, this is where you can add your own images to the library. The standard Pic-See images are accessible through the Choice Board icon. Your custom images will show up there as a tab option as well.
In addition to the really clean interface, I like the nice subtle tones heard when selecting an image or button.
There are four main buttons in Pic-See:
Pic-See Friends,
Pic-See Library,
Emotions Centre*, and
Choice Board .
*(Not a typo!) This app is written in Australian English, and there a few instances where the vocabulary in the library is different, but it is not drastic- Dressing gown (bathrobe), pack up (clean up), swimming costume, and a few instances of different spellings: moisturise, pyjamas .
Pic-See Friends :
Edit Profile,"See-quences", User Reports
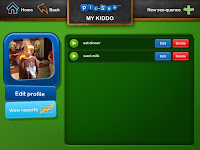
This is where you access and edit different users' profiles. You can have two different users in this version of the app. If you need more users, there is a Multi User version of this app called Pic-See Collective. This is also where you can create, edit and save "See-quences" to load for later use. The "See-quences" are a series of images or steps that can be checked off one by one. A reward can be incorporated into the sequence as well. In addition, you can review and send reports with usage patterns for each user!
Edit Profiles
To edit a profile, tap on the User's image from the Pic-See Friend's screen, then tap on the
Edit profile button below the User's image. From here, you can take a new photo, browse the iPad library to add an image, and fill out data for the User, including name, age, M/F, and email for reports. You can also delete a user through the
Delete this user button at the bottom of the screen.
Create and Edit a "See-quence"
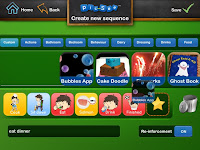
To create a sequence, enter the Pic-See Friends screen and tap the user you want. A screen will pop up showing any existing "See-quences" saved for that user. In the top right-hand corner, select the
New See-quence icon. You will be brought to a new screen with categories tabs for all the included images in the app, plus a tab for your custom photos as well. Scroll through the images and simply hold and drag an image to an empty square below to create each step in the sequence. If the Reinforcement button is turned to on, you must select a reward as the last square in the sequence. That square will be marked with a star icon. Tap the blue
Edit button to the right of the sequence title to edit it. This will bring you back to the same interface that you use to create a sequence. You can change the images, or rename the title of the sequence, turn the reinforcement (reward) on/off. You can delete a sequence by tapping the red
Delete button to the right of a sequence's title.
 Load a "See-quence"
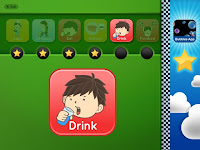
To load a sequence, select the User you want, then choose a sequence from the playlist by tapping the green
Play icon to the left of each sequence's title. A strip at the top of the screen will show each step in the sequence, and the first step will take up the bottom half of the screen. When the large icon indicating the current step is tapped, a star will be awarded and shown under each step of the sequence strip. The reward is displayed to the right of the screen. When the last step in the sequence is completed, a short reward video plays, after which you can give the User the promised reward (an image of the reward does not remain on the screen- this would be useful as a visual reminder to the User.)
 User Reports
This is a great feature! After selecting the Pic-See Friends icon, select the user you want, then select the "View Reports" tab under the User's image. This will bring up a list of dates and what See-quences were completed, along with a time stamp for each sequence. You can send a report to your email for today, or reports for the last 7 days.
Pic-See Library:
Custom Images
Add custom pictures to the library:
Tap the Pic-See Library icon, then tap the
Add Item button in the upper right-hand corner.
Wish List
Edit existing pictures in the library:
You can delete a custom picture by tapping the red
Delete button to the right of the image title. It will take you to a new screen confirming whether you really want to delete the image or not. If you tap the blue
Edit button to the right of the image's title, you can rename the image, take a new image through the iPad's camera or from your iPad's library, and record a new message. There is also a handy
Flip image option directly under the image. If you tap the image itself it will open up the iPad's camera to take a new shot quickly- tap the cancel button to exit out of the camera and retain the original image.
Emotions Centre:
Emotions choice board/Emotions gauge
The Emotions Centre has 6 emotions a child can select to show how they are feeling- Angry, Excited, Happy, Sad, Scared, Surprised. There is also a button to select whether a boy or girl character will be used for the emotions images. What I really love about this is when the child selects an emotion, a new screen pops up which allows the child to assign a degree of emotion- for example if the child selects Angry, three images of varying degrees of angry will appear: Neutral, Angry, Very Angry. Above the 3 images is a slider scale from 1 to 10. The child can use the slider or tap a number to indicate exactly how angry he/she is. This could be very useful for helping a child be aware of his feelings, and how to find ways to cope and calm down when at a 5, not a level 10 angry, for example. I would love to have an option for Pain/Hurt included in the Emotions Centre.
Choice Board
Create the Choice Board:
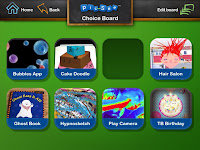
This is so easy! When you tap the Choice Board icon, it will automatically load whatever choice board you were using last. To edit, tap the Edit board icon in the top right-hand corner. There will be small blue tabs for all the categories of the included library images, as well as a tab for any custom images you have added to the app. Below is a number line with empty squares numbered 1 to 8. Tap a tab to bring up all the choices in that category- you can use a swiping motion to scroll through them. To add an image to a new choice board, just hold and drag the image you want to any empty number below. If you realized you forgot a step, you can rearrange the images in the order you want by holding them and dragging them to a new spot.
Use the Choice Board:
Tap the
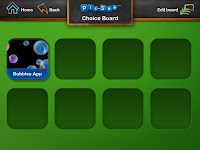
Choice Board icon from the main screen. The last Choice Board used will pop up on the screen. The interface is a little different from what I've used in a choice board. If you tap an image it will disappear and show an empty square. I'm not sure if the goal is to choose the item that you tapped and that has disappeared, or if the goal is to tap and "hide" all of the images depicting choices you do not want, leaving the one choice you want remaining on the screen. In my experience, typically one image is tapped, and that image then fills the screen for the User to view.
 Wish List
* I had a chat with the developer recently and am happy to say that there is an update planned to address some of these wants, so stay tuned!
Wish List
* I had a chat with the developer recently and am happy to say that there is an update planned to address some of these wants, so stay tuned! *
I'd like to clear up confusion on how to use the Choice board in this app. I also feel the amount of users for this app could be upped to at least three or four, to cover the needs of more families who have more than 2 children. There is a Pic-See Collective version, which will allow up to 10 users, but at $189.99 it is much pricier and more suited to an educational setting. I really like the ease of the use with this app, and it's clean interface, but I still think there is room for improvement when it comes to the editing process without sacrificing this. When adding a custom image, I would love to be able to crop an image from within the app, or pinch to zoom in or out to center the image the way I want. There is a 12 character limit for the titles, which is not enough for titles like "Toca Boca Kitchen" for example. I would prefer the option to use a slightly smaller font and less margins in cases where a title is longer than 12 characters. I would love to be able to edit the title of the built-in images (this would be of great benefit to users of all different language backgrounds) or delete a few of the built-in images that I won't be needing (coffee, for example). Lastly, I would love to sort my custom images among the categories provided for the included library of images- currently any custom images stay in their own tab,
Custom.
 Kidspiration Maps by Inspiration Software, Inc. ( iPad, $9.99 at time of review)

 Kidspiration Maps by Inspiration Software, Inc. is from the maker of Inspiration Maps (early version reviewed here) . It is a visual and interactive mind mapping and graphic organizer tool for kids, preloaded with activities divided up into the following categories: Reading & Writing, Social Studies, Science, and Math.