Monday, August 27, 2012

Thanks to my "Secret Santa" I have a KidBox case!

There is a special "Secret Santa" type program for teachers that I signed up for at redditgifts.com. I signed up in passing after seeing a friend post on it, and much to my surprise a couple of weeks later- this Saturday- this lovely gift showed up at my door!  It is called the KidBox Cover by KaysCase and I love it.  I was afraid the foam would be too thin or flimsy when I put it on my wish list, but I had yet to find a case with a handle that was lightweight-  the verdict is in and it's not flimsy!  I have tried out an Otterbox and Griffin Survivor -They are definitely good cases, but they are also pretty heavy!  I still find them very good choices for a child with direct access to an iPad who is a bit on the destructive side, but for a situation where the adult is in control of the iPad, but is working with kids- I think this KidBox is the perfect compromise, until those three team up to make a KidBox with Griffin's screen protector and Otterbox's hard snap-on lid ;)  It does not have a built in screen protector, but my secret Santa sent me one as well!  I'll see how it holds up with my preschool special needs students, especially. If need be, I believe there are protective "faceplates" I could purchase- there is some wiggle room to install something like that over the iPad screen but inside the case.  Also, the iPad seems decently recessed in the case so that if it were to fall on its face it would be just fine. Cross fingers!
 
It is still easy to charge without taking it out, I can access the volume and on/off switch too. And I love that I can use the handle as the stand.  It will stand up in landscape mode on the handle -it seems a little precarious as if it might fall over but it hasn't on a smooth surface.   I can fold it the other way to have a comfortable angle for typing data or using with a kiddo on the floor.  I think it is great for a therapist or teacher.  It would probably be great for most parents to use with their children too, but if you have a child who bites or tears at things I am not sure how it would withstand that, which would be a concern if I ever manage to get a device loaning program established for local parents. (Some of my students might help me figure out the answer first ;) )
 
 
Anyhow no more whining about finding a protective but lightweight case with a handle.  I think this is perfect for my needs!  Thank you, C.W.M. - I will be figuring out a way to pay this forward ;) 


Sunday, August 26, 2012

Review and Giveaway: AutisMate by SpecialNeedsWare

AutisMate, by SpecialNeedsWare

I can't even begin to describe all the capabilities of this app- it is very feature rich.  The best way to get a sense of this app is to watch the video of it; the tutorial within the app itself will take care of the rest: SpecialNeedsWare's video tour of AutisMate  What I can add is that is very versatile- you can add your own pictures, or use the extensive library of SymbolStix; you can use synthesized speech or record your own voice, which is especially great for non-native English speakers but also for users who need a familiar voice-  It also has a GPS feature you can enable where based on your location the correct scene will come up.  You can also manually switch locations as well by pressing on the map icon in the upper right hand corner of the screen.

Modes of Communication/Learning

There are two main "modes" the user can access for communication and learning: Scenes, and Word boards. Within the Scenes you can embed "hot spots" that contain images, symbols or videos.  Within the scenes you can create what AutisMate calls "Story Spots".  These are stories to teach a skill/show a sequence of steps.  You can create word boards along the bottom of the screen containing categories and buttons. I love how you can nest categories- it doesn't seem as there any limitation- in other words I can make a category with subcategories, and sub-sub categories (totally made that term up, hah!)

The editing functions can be shut off through the Settings on the iPad itself, so no worries about a user accidentally deleting pages or scenes.  (If you look at the screen shots, you'll notice some have a row of editing buttons)

Accesibility

Another thing I love about AutisMate is the consideration for users with motor difficulties.  The scene buttons are large- six scenes occupy each page, and a swipe reveals additional pages of scenes. The word board buttons and the hot spot buttons are both adjustable in size. The hot spot buttons' largest size is about the size of a half dollar.
As for the scrolling row of symbols that can be accessed along the bottom of the screen, they are decently sized too- about the size of a postage stamp if I had to guess.  Once a symbol is selected, the word board itself can be set to display as few as 2 or as many as 18 buttons on the screen- the user can swipe to access additional rows of buttons.

Some Uses

Aside from the obvious purpose of communication, here are a few more specific ways I am using the app for communication, and learning:

Making Choices 
 I easily set up a "My iPad" choice board for my sons' and students' choice of iPad apps- in fact I was able to use the "copy" feature to use the same buttons under my son's category and my students' category. It is very easy to set up new pages of buttons.  Also I can easily add a scene and embed a pop-up choice board under a hot spot . Next up is adding a hot spot to a picture with the computer, and putting choices of computer games in it.

Safety
 I made a "Help" scene that I did not share for privacy reasons that has a picture with all my son's emergency contacts that I had taken at a family gathering (you could also use one of many photo frame editing apps to assemble everyone in one image). We are practicing their phone numbers, which I have recorded in a hot spot for each family member. The next step will be setting up a Story Spot showing what kinds of places to go to ask help- my son recently got lost at a special birthday celebration for Grandma at a very large, crowded hotel; my son was terrified, and did not know to look for the reception desk to get help from an employee, even though he most likely did know our phone number. I think making Story Spots with pictures of a reception desk, and hotel gift shop- perhaps with embedded videos of what to say to the employees if lost- would have helped tremendously in this situation.

Teaching new skills
As mentioned above, you could have a picture with various relatives with their names/ phone numbers embedded in hot spots, or you could use video modeling embedded in a scene to present a new skill- pouring juice, tying shoes- , saying hi to a teacher. A Story Spot could be used to present a sequence of steps to the user- After tying my son's shoes about a zillion times the other day, it's time to set up a sequence for that a.s.a.p. I can also easily, and embed them under a hot spot. Next up is adding a hot spot to a picture with the computer, and putting choices of computer games in it.

Medical needs
Add hot spots to a picture of a body with Pop-Up symbols/phrases for each.  For  example I set a body picture as a scene, added a hot spot to "stomach", and then added a pop-up window with two symbols- "stomach", and the phrase "my stomach hurts" If I remember the next time my son has a stomach ache, I can take a picture of him and we can include that as a conversation starter as well.  Remember when... (relating past experiences is a goal we are currently working on)

Reinforcing skills
If your child is struggling to do something but has done it in the past, video modeling can serve as a reminder of the process. If a child struggles with getting his shoes on before leaving the house, you could take a picture of where you child's shoes are stored, then embed a video of the user putting his shoes on. You can play the video before the child puts his shoes on.

Shaping behavior
As for my own son, we are working on getting off the computer instead of clinging to it while screaming "Wait, wait!" ;) Now that summer is coming to an end and there will be more school and less play, I am sure we will be practicing this with AutisMate very soon!

Wish List
(I always have one!)

During set up there was one thing I would like to change- when I set a label for an image, I would love to use whatever the label is to simultaneously record the phrase (Synthesized option, obviously). This would save a lot of set up time instead of setting the label by typing it in, then going to "Record the phrase" and again typing the exact same message in.

The symbols get really pixelated when used as a scene background i.e. using the symbol "body" to teach body parts with hot spots for different areas of the body. For my own kiddo I can use a real picture of him, but for students, I need to use an illustration to teach these concepts. However, if the solution for making the images crisper at this size is to increase the size of the app, I'd rather search for a higher resolution google image instead, as I prefer more space on my iPad. This is not a lightweight app as it stands- The app store description claims 389 MB, but usage stats in my iPad weigh this app in at 458 MB- and that's not including extra megabytes from my own added content (535 MB).   As an educator, parent of a child with special needs, and an community advocate sharing every app I can get my hands on, I tend to obsess about every little megabyte. But no worries, for the vast majority of people this is a non-issue (and there are quite a few special needs apps nearly double this size, by the way, trust me, you will be more than fine in terms of storage space.)

End result - it's a keeper!  I am sure as the school year progresses I can think up a bunch of new ways to use AutisMate with my kiddos!

And yes, I consciously chose to keep the top three stock images that came with the app for the kitchen, room and bathroom for the purposes of this review... they make my house look much prettier than in real life. The first image is in user mode, the second screenshot is identical but in edit mode.

I set the app to GPS mode to keep the app on the "Home" scenes. This is in user mode. 
This is identical to the first screen shot, but with edit mode activated.


This is the most accesible setting, two buttons per screen. This is in edit mode. The blue slider bar at the top is set all the way to the right, to the largest, most accesible setting.


Using the smallest setting of buttons, in editing mode. You can touch the blue question mark to open the help comments in red.


The hot spots set to their largest, most accessible setting. This is in user mode. If the face symbol is tapped, the word boards will pop up.If the hotspots are tapped, an image or group of images (i.e. food choices under the yellow star) , a series of images (a Story Spot) or a video will be displayed.


A "choice board" I made for iPad app choices.


I selected the category "Mom's choices" from the previous screenshot to reveal more category buttons to choose from. If I had included the next screenshot in the series, it would show a series of buttons, each with a different app title on it.


The first image of several in a StorySpot about using the iPad.


a Rafflecopter giveaway


Wednesday, August 22, 2012

App Review and Giveaway: Where's My Dress? by Thematica


Where's My Dress? by Thematica (99 cents at time of review)

Where's My Dress? is an early learning app that will help teach young children about dressing appropriately for the weather.  It is one of a handful of early learning apps by Thematica (Where's My Dress? , Cars in sandbox - Space rover, Cars in sandbox - Construction) This is so cute- the characters react to the environment  outside (choose from a boy or girl). He or she will react with noises, facial expressions, and movements, depending on what the child places on the character!  For example, if it is snowing outside and the character is wearing a tank top and underwear, a thought bubble will indicate what is needed for the current weather (in this case, a winter hat).   Then the character will frown and mutter if you provide a different selection ( i.e. a baseball cap).  You must pick a hat, a pair of shoes, and the correct corresponding outfit.  The outfit itself is one unit- you cannot switch out tops and bottoms for that outfit- touch it and drag it to the character for the whole set to appear on him or her.  I actually prefer this, as I intend to use this with preschoolers who need this simplicity.  I also immediately started tapping things in the environment to see what they would do, but the other non- clothing items are not interactive. I think this is a good thing for my highly distractable preschoolers, and the fact that I noticed this says more about our expectations that digital media means everything must "do something".   I will get used to this quickly I am sure. The only caveat is the boys' shoes for summer and spring look interchangeable to me, but the character will complain of being too hot in the pair of lace up sneakers.  Once the character is dressed appropriately, tap the door to send the character outside- a short video scene will play of the child doing an activity- having a picnic in spring, playing in the snow in winter etc.  A fun way to reinforce early weather concepts!


a Rafflecopter giveaway

Saturday, August 11, 2012

Review: Pic-See by Pic See Pty Ltd.

Pic-See ($29.99 at time of review, iPad only)

Pic-See 1.0
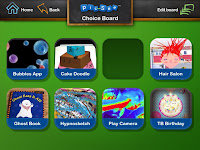
I love the included library of images- very clean and simple.  At first I thought the image library hadn't downloaded properly, as when I tapped on the Pic-See Library icon, there weren't any images.  As it turns out, this is where you can add your own images to the library.  The standard Pic-See images are accessible through the Choice Board icon.  Your custom images will show up there as a tab option as well.

In addition to the really clean interface, I like the nice subtle tones heard when selecting an image or button.
There are four main buttons in Pic-See: Pic-See Friends, Pic-See Library, Emotions Centre*, and Choice Board

*(Not a typo!) This app is written in Australian English, and there a few instances where the vocabulary in the library is different, but it is not drastic- Dressing gown (bathrobe), pack up (clean up), swimming costume, and a few instances of different spellings: moisturise, pyjamas .

Pic-See Friends :
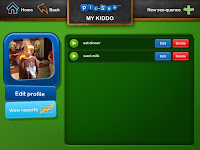
Edit Profile,"See-quences", User Reports
This is where you access and edit different users' profiles. You can have two different users in this version of the app. If you need more users, there is a Multi User version of this app called Pic-See Collective.  This is also where you can create, edit and save "See-quences" to load for later use.  The "See-quences" are a series of images or steps that can be checked off one by one. A reward can be incorporated into the sequence as well.  In addition, you can review and send reports with usage patterns for each user!

Edit Profiles

To edit a profile, tap on the User's image from the Pic-See Friend's screen, then tap on the Edit profile button below the User's image.  From here, you can take a new photo, browse the iPad library to add an image, and fill out data for the User, including name, age, M/F, and email for reports.  You can also delete a user through the Delete this user button at the bottom of the screen.

Create and Edit a "See-quence"

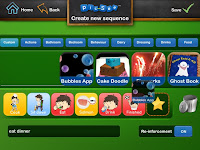
To create a sequence, enter the Pic-See Friends screen and tap the user you want. A screen will pop up showing any existing "See-quences" saved for that user.  In the top right-hand corner, select the New See-quence icon.   You will be brought to a new screen with categories tabs for all the included images in the app, plus a tab for your custom photos as well.  Scroll through the images and simply hold and drag an image to an empty square below to create each step in the sequence.  If the Reinforcement button is turned to on, you must select a reward as the last square in the sequence.  That square will be marked with a star icon.    Tap the blue Edit button to the right of the sequence title to edit it. This will bring you back to the same interface that you use to create a sequence. You can change the images, or rename the title of the sequence, turn the reinforcement (reward) on/off. You can delete a sequence by tapping the red Delete button to the right of a sequence's title.


Load a "See-quence"

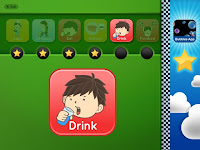
To load a sequence, select the User you want, then choose a sequence from the playlist by tapping the green Play icon to the left of each sequence's title.  A strip at the top of the screen will show each step in the sequence, and the first step will take up the bottom half of the screen. When the large icon indicating the current step is tapped, a star will be awarded and shown under each step of the sequence strip. The reward is displayed to the right of the screen.  When the last step in the sequence is completed, a short reward video plays, after which you can give the User the promised reward (an image of the reward does not remain on the screen- this would be useful as a visual reminder to the User.)



User Reports

This is a great feature! After selecting the Pic-See Friends icon, select the user you want, then select the "View Reports" tab under the User's image.  This will bring up a list of dates and what See-quences were completed, along with a time stamp for each sequence. You can send a report to your email for today, or reports for the last 7 days.


Pic-See Library:
Custom Images

Add custom pictures to the library:
Tap the Pic-See Library icon, then tap the Add Item button in the upper right-hand corner.
Wish List

Edit existing pictures in the library:

You can delete a custom picture by tapping the red Delete button to the right of the image title. It will take you to a new screen confirming whether you really want to delete the image or not. If you tap the blue Edit button to the right of the image's title, you can rename the image, take a new image through the iPad's camera or from your iPad's library, and record a new message. There is also a handy Flip image option directly under the image. If you tap the image itself it will open up the iPad's camera to take a new shot quickly- tap the cancel button to exit out of the camera and retain the original image.

Emotions Centre:
Emotions choice board/Emotions gauge 

The Emotions Centre has 6 emotions a child can select to show how they are feeling- Angry, Excited, Happy, Sad, Scared, Surprised.  There is also a button to select whether a boy or girl character will be used for the emotions images. What I really love about this is when the child selects an emotion, a new screen pops up which allows the child to assign a degree of emotion- for example if the child selects Angry, three images of varying degrees of angry will appear: Neutral, Angry, Very Angry.  Above the 3 images is a slider scale from 1 to 10.  The child can use the slider or tap a number to indicate exactly how angry he/she is.  This could be very useful for helping a child be aware of his feelings, and how to find ways to cope and calm down when at a 5, not a level 10 angry, for example.  I would love to have an option for Pain/Hurt included in the Emotions Centre. 

Choice Board
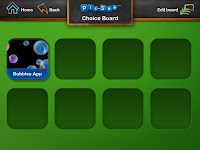
Create the Choice Board:

This is so easy! When you tap the Choice Board icon, it will automatically load whatever choice board you were using last.  To edit, tap the Edit board icon in the top right-hand corner.  There will be small blue tabs for all the categories of the included library images, as well as a tab for any custom images you have added to the app. Below is a number line with empty squares numbered 1 to 8.  Tap a tab to bring up all the choices in that category- you can use a swiping motion to scroll through them.  To add an image to a new choice board, just hold and drag the image you want to any empty number below. If you realized you forgot a step, you can rearrange the images in the order you want by holding them and dragging them to a new spot.


Use the Choice Board:

Tap the Choice Board icon from the main screen. The last Choice Board used will pop up on the screen.  The interface is a little different from what I've used in a choice board.  If you tap an image it will disappear and show an empty square.  I'm not sure if the goal is to choose the item that you tapped and that has disappeared, or if the goal is to tap and "hide" all of the images depicting choices you do not want, leaving the one choice you want remaining on the screen.  In my experience, typically one image is tapped, and that image then fills the screen for the User to view.
 

Wish List

* I had a chat with the developer recently and am happy to say that there is an update planned to address some of these wants, so stay tuned! *
I'd like to clear up confusion on how to use the Choice board in this app.  I also feel the amount of users for this app could be upped to at least three or four, to cover the needs of more families who have more than 2 children.  There is a Pic-See Collective version, which will allow up to 10 users, but at $189.99 it is much pricier and more suited to an educational setting.  I really like the ease of the use with this app, and it's clean interface, but I still think there is room for improvement when it comes to the editing process without sacrificing this. When adding a custom image, I would love to be able to crop an image from within the app, or pinch to zoom in or out to center the image the way I want.  There is a 12 character limit for the titles, which is not enough for titles like "Toca Boca Kitchen" for example. I would prefer the option to use a slightly smaller font and less margins in cases where a title is longer than 12 characters.  I would love to be able to edit the title of the built-in images  (this would be of great benefit to users of all different language backgrounds) or delete a few of the built-in images that I won't be needing (coffee, for example).  Lastly, I would love to sort my custom images among the categories provided for the included library of images- currently any custom images stay in their own tab, Custom.


Monday, August 6, 2012

BehaviorLENS - a behavior data tracking app


BehaviorLENS by SuperPsyched, LLC (iPad only, $29.99)

BehaviorLens is now BehaviorSnap- there are some changes, so please read the App description carefully, as it is accurate- it has changed to a subscription model with a yearly subscription, although when you purchase you can make up to 12 reports,  plus there are also some additional features that were added after this app was reviewed that may be of value if upgrading to subscription.  (link above should still work)-Special Apps, Special Kids

For an overview of BehaviorLENS alongside other data tracking apps, see here.


My new favorite for data tracking with students! Simple (as in straightforward) yet powerful. The charts are visually appealing and easy to understand. I could also see this working for most parents who are interested in focusing on a few main behaviors to track- say for example the same behaviors set in your child's Behavior Plan at school. For those of us tracking special diets/allergies and a zillion possibly related specific behaviors or symptoms, this will not be the best fit. The decision to allow tracking of a small number of key behaviors instead of unlimited behaviors was a very conscious one- this focus is clear when you start the app and are able to effortlessly navigate, add students and school sites, begin an observation, view data, send a report- all within a few minutes.
Setup is super easy for this app. I did not need to read any manuals to figure anything out, which is much appreciated!

BehaviorLENS allows data tracking of four different types: Interval Recording, Frequency Count, Duration, ABC. In Interval Recording mode the behaviors are already preset, and all you need to do is select the behavior that matches from the list of choices that pop up during the interval tracking.  I didn't find this to be a problem for recording data in a classroom setting- everything I needed to record was already there!  However for tracking specific behaviors like a certain kind of vocalization- for example if you want to see if there is a reason for humming versus squealing, you will need to use one of the other three types of data collection, where you can add your own behaviors you wish to focus on  (Frequency Count (up to four behaviors), Duration (up to four behaviors), and ABC).
Another useful feature is the ability to add notes that are attached to the reports. They also show up in the observation itself, with a time stamp. I find this super helpful.


One capability of BehaviorLENS that is not currently pictured are Line Graphs to show data over multiple observations (as opposed to the Bar Graphs for single observations included in this review. You can also generate graphs that include multiple observations on one graph, which can be very useful for looking at behavior trends over time.

ABC Tracking

 The ABC (Antecedent Behavior Consequence) Tracking also has built in choices to select from, but you can add your own as well.  The built in choices make it really easy for you to "classify" these antecedents, behaviors and consequences, which is awesome for anyone, but especially for someone who may not be as familiar with the concept of ABCs. This really breaks it down for you.  For example for Antecedent, which is simply whatever occurred immediately before a behavior- are the choices Demand/Request Given, Difficult Task Presented, Transition, Alone (No Attention) (I may have added the last example).  I use this section at home a lot, so I also added "brother provoked verbally", "brother provoked physically"- so that I can keep an eye on how my son is responding to teasing or bullying from his sibling, when it is happening and help both of them put a stop to it! Under Behavior (the behavior your child is doing) are the choices Verbal Outburst, Physical Outburst, Avoidance Behavior; you can add your own here as well.  Under Consequence (which is whatever happens immediately after the behavior) are choices divided into subcategories "Perceived Functions" and "Actual Consequence".  Under Perceived Functions are the choices Get Desired Item/Activity, Get Self-Stimulation, Avoid Demand/Request, Avoid Activity, Avoid Person.  Getting on my soapbox now: I appreciate the term "perceived" because sometimes we really can only take a guess as to why a child is engaging in a behavior.  I know my own son moves his jaw from side to side when he has eaten something he is allergic to.  (One of the benefits of being a mom who like my son also has food allergies and the same symptom- as I know exactly why he is doing that!) To an outsider the Perceived Function might be "Get Self Stimulation", when actually I recognize it is a sign of pain or discomfort.  Something to consider.  Under "Actual Consequence" are Attention, Redirection, Task/Demand Removed.  Again, you can add your own.   You can view each separate behavior and what antecedents and consequences are correlated with it, or view all behaviors together, and so on.


Frequency Count

The frequency count feature is as straightforward as can be. Select or add up to four behaviors to observe, and press the corresponding buttons for each to record each instance.  Here is a screenshot of a Frequency Chart from a report.


Duration

Duration simply records how long each behavior is occurring, and displays the total time for each of those behaviors as well. It also allows behaviors to overlap.  For example you can track a child "not attending the teacher" as well as "vocalizing" at the same time.  If you look closely as you record, you may be able to notice another neat feature of duration tracking- every time you stop the recording button for a behavior, a thin white line will show.  This is useful because you can visually assess how long a behavior is lasting. You can see whether there are long periods of time without that behavior (few white line "breaks"), or whether the behavior is occurring much more frequently (many white line "breaks" spaced closely together- look at the behavior Vocalizing in the screenshot) The app also keeps a count for each instance a behavior occurs, but only through this observation screen.  When viewing it as a report, the frequencies of behaviors are not shown, although a list of each change recording during the tracking automatically is shown in the Observation Notes section of the report. 


Interval Recording

If you have keen eyes you will have spied the time on some of the screenshots- I did not observe students at 10:00 p.m. or 1:30 a.m.  but in the interest of protecting my son's and students' privacy, the late night recreation and screenshot won out.  Another plus- you'll notice along the top of the screen that "Teacher" "Student" and "Setting" have been left unassigned.  You can start recording data before selecting the student, teacher etc.  This is very helpful when you walk in to a room and want to start immediately recording data.  At any time during the observation, you can tap the corresponding buttons at the far right of the screen to fill in the data.  You can also end an observation earlier than planned- which works really well when the fire alarm suddenly goes off (true story).

One of the visual features I admire: the green/red coding for On Task and Off Task Behaviors.  When it is time to record a behavior, the recording symbol will show.  When you tap it, a pop up will display with On Task Behavior in green, and Off Task Behavior in red. Select the correct color, and a new pop-up with choices will come up. Record the appropriate choice(s), and the bar will turn to either green or red to show whether the behavior was On Task or Off Task. After doing interval recording, the reports for On Task Behavior vs. Off Task Behavior are also shown in green and red. This makes it really easy to glance at a chart and get a clear picture of what is going on. You can either focus solely on your child, or take comparative data for a typical peer as well. Even better, you can decide how often you want to take data for that peer- do you want to take data each interval, as you are taking data for your child, or every other interval, or every third or fourth interval.


You can also hone in on what situations a child is having On Task Behavior versus Off  Task behaviors, for either your student, or a typical peer (On Task and Off Task Student reports shown below).  I find this really useful for seeing what is working for a child and what is not.


Wish List
(I always have one)
I thought my wish list would include the ability to track a whole bunch of behaviors at once, but I'm finding the interface is wonderful just the way it is in that regard- I fear if that capability were added it would not be so easy and uncluttered as it is now. As for the Interval recording- I would love to see an option for higher interval lengths. Right now you can set an observation to last anywhere from 5 minutes -increasing in 5 minute increments- up to 60 minutes, which is perfect.  The Observation Interval Lengths to choose from are 15 seconds, 30 seconds, 45 seconds, and 60 seconds.  A 5 minute interval would be a really desirable option to add, in my opinion.  One thing I will need to check with the developer about - deleting old behaviors from the list of choices.  Deleting students or reports from the main page is easy, however- just swipe and confirm delete.  Perhaps a tab with our personalized choices could be added to the main screen and the same swipe/ delete function could be used? Also, a lite version would be wonderful, so parents can try it out to see if it best meets their needs.  


Sunday, July 22, 2012

So Much 2 Say AAC App Giveaway #3


This is SASK's third opportunity to give away copies of the AAC app So Much 2 Say, which I am always thrilled about as I use this app often with several of my students, and would love to see another educator or parent benefit from this app.  Not only is So Much 2 Say a great option for emerging communicators, its customer service and updates are top-notch. The latest update brings a really neat Drag n Drop sharing feature- two devices with So Much 2 Say loaded can communicate with each other, allowing you to easily copy cards from So Much 2 Say on one device to the other.  In addition a black background has been added as an option... the next update involves the ability to create sentences! 

Here is the iTunes link: So Much 2 Say $19.99
Here is a video describing the new drag and drop card sharing feature: Drag N' Drop feature

You can enter through the Special Apps, Special Kids Giveaways tab, https://www.facebook.com/SpecialAppsSpecialKids/app_208195102528120

If you are Rafflecopter phobic but still interested in participating, contact me at specialappsspecialkids@gmail.com and tell me about your shares and so on.  I would be more than happy to enter manually for you. Good luck!